Shoe Rack : How to Organize: A Comprehensive Guide
Shoes are an essential part of our wardrobe, but they can also be a source of clutter if not properly organized. Whether you have a small closet or a large walk-in, there are several shoe storage solutions available to help you maximize space and keep your shoes looking their best.
Shoe Rack Organization: A Step-by-Step Guide for a Clutter-Free Home
Shoes are a fashion statement and a necessity, but they can quickly turn into a messy pile without the right organization. Whether you’re a shoe aficionado or simply want to keep your entryway tidy, a well-organized shoe rack is the key. Here at HoumeIndia, we’re passionate about creating stylish and functional living spaces. That’s why we’ve put together this comprehensive guide to help you conquer shoe clutter once and for all.
Must Buy shoe Rack Links by Houme India
1. Ikea
Pros:
- Space-saving: The wall-mounted design frees up valuable floor space, making it ideal for smaller homes or apartments.
- Sturdy construction: The metal build feels durable and can withstand regular use.
- Easy assembly: The DIY instructions are clear and straightforward, although having a drill is recommended.
Cons:
- Limited shoe size: The shelves might be a bit narrow for larger shoe sizes or bulkier boots.
- Door opening mechanism: Some users found the doors to be a bit flimsy and prone to falling open if not handled carefully.
- Powder coating: While advertised as 100% powder-coated, a few users reported minor chipping or scratches over time.
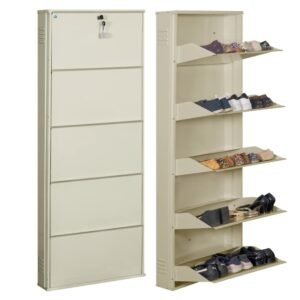
2. Angular Metal Shoe Cabinet

Pros:
- Affordable: This two-pack offers excellent value for the price, making it a budget-friendly choice for organizing your shoes.
- Space-Saving: The shallow depth of the rack makes it perfect for narrow hallways or small entryways.
- Stackable and Customizable: You can stack multiple units or place them side-by-side to create a customized storage solution..
Cons:
- Plastic Construction: While the polypropylene plastic is durable, it may not be as sturdy as some other materials.
- Limited Shoe Capacity: Each rack can hold approximately 3-4 pairs of shoes, depending on the size and style.
- Requires Wall Mounting: For stability, IKEA recommends mounting the rack to the wall (screws not included).
Pros:
- Space-Saving Design: The wall-mounted option allows for efficient use of floor space, keeping your entryway or closet organized and open.
- Durability: Made from CRCA steel, the cabinet is sturdy and resistant to corrosion, ensuring long-lasting use.
- Ventilation: The design includes small holes for ventilation, helping to prevent odors from building up inside the cabinet.
Cons:
- Assembly Required: Some users may find the assembly process a bit challenging, though instructions are provided.
- Limited Color Options: Currently available only in textured white, limiting choices for those seeking other colors.
- Price: The price point may be considered high for some budgets, though the quality and functionality justify the cost for many.
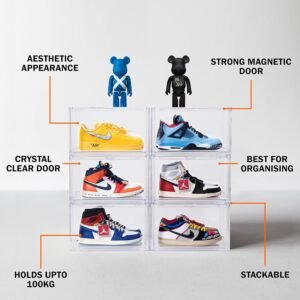
3. Shoe Acrylic Box -
Pros:
- Space-saving: The wall-mounted design frees up valuable floor space, making it ideal for smaller homes or apartments.
- Sturdy construction: The metal build feels durable and can withstand regular use.
- Easy assembly: The DIY instructions are clear and straightforward, although having a drill is recommended.
Cons:
- Limited shoe size: The shelves might be a bit narrow for larger shoe sizes or bulkier boots.
- Door opening mechanism: Some users found the doors to be a bit flimsy and prone to falling open if not handled carefully.
- Powder coating: While advertised as 100% powder-coated, a few users reported minor chipping or scratches over time.
Pros:
- Visibility: The transparent design allows you to easily identify your sneakers without having to open each box. This is a major plus for those with extensive collections.
- Sturdy Construction: The heavy-duty plastic feels durable and capable of withstanding stacking, which is essential for maximizing storage space.
Cons:
- Ventilation: While the plastic is sturdy, it lacks ventilation holes. This might be a concern for those living in humid climates, as it could lead to moisture buildup inside the box.
- Price: The set of 5 might be considered a bit pricey for some budgets, especially if you have a large sneaker collection requiring multiple sets.
4. Shoe Organisers -
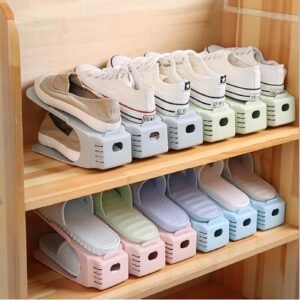
Pros:
- Adjustable Slots: The adjustable nature of the slots accommodates various shoe sizes and styles, from heels to sneakers.
- Sturdy Construction: The durable plastic build ensures the slots can withstand regular use and maintain their shape.
- Easy Assembly: The organizer is relatively straightforward to assemble, requiring minimal tools or effort.
Cons:
- Aesthetics: The design is functional but lacks a visually appealing finish, which might not be suitable for everyone’s taste.
- Bulk Purchases: The product is sold in packs of 12, which could be excessive for those with smaller shoe collections.
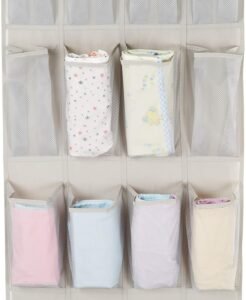
Pros:
- Space-saving: The organizer hangs conveniently over your door, freeing up valuable floor or closet space.
- Large capacity: With 24 pockets, it can hold up to 12 pairs of shoes or 24 pairs of sandals or flats.
- Affordable: It’s a budget-friendly option compared to other shoe storage solutions.
Cons:
- Material: The metal frame might not be as sturdy as some users prefer, and could bend under the weight of heavy shoes.
- Pocket size: The pockets are best suited for smaller shoes, and may not accommodate larger or bulkier footwear.
- Aesthetics: The design is quite basic and may not appeal to everyone.

Pros:
- Durable and spacious
- Versatile: holds shoes, toiletries, or more
- Easy to clean and affordable
Cons:
- Not padded:** While it protects from dirt and scuffs, it doesn’t offer much cushioning if you’re worried about your shoes getting crushed in a packed suitcase.
- Limited styles:** It comes in a few basic colors, which might not be to everyone’s taste.
Customize Your Shoe Rack
Consider customizing your shoe rack to fit your specific needs and available space.
Add shelves or drawers to an existing rack to increase storage capacity.
Build your own shoe rack using DIY tutorials or hire a professional for a custom-made solution.
Use adjustable shelves to accommodate shoes of different heights.
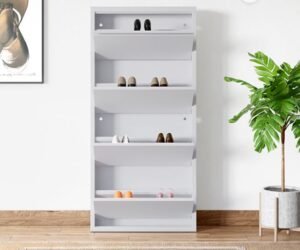
Install a tilting shoe rack to easily view and access your shoes.
Consider customizing your shoe rack to fit your specific needs and available space.
Evaluate the number of shoes you own, their sizes, and the available space in your closet or entryway.
Consider the type of shoes you frequently wear and prioritize their placement on the rack.
Choose a shoe rack design that complements your home décor and personal style.
Add shelves or drawers to an existing rack to increase storage capacity.
Purchase additional shelves or drawers that are compatible with your existing shoe rack.
Ensure that the shelves or drawers are sturdy and can support the weight of your shoes.
Arrange the shelves or drawers in a way that maximizes storage space and accessibility.
Build your own shoe rack using DIY tutorials or hire a professional for a custom-made solution.
Gather the necessary materials, such as wood, screws, and nails, and follow step-by-step DIY tutorials to create a personalized shoe rack.
If you prefer a more professional finish, hire a carpenter or cabinetmaker to design and build a custom shoe rack that meets your exact requirements.
Use adjustable shelves to accommodate shoes of different heights.
Choose a shoe rack with adjustable shelves that can be raised or lowered to fit shoes of different heights, such as boots, sneakers, and heels.
Adjust the shelves to create optimal storage space for all your shoes.
Install a tilting shoe rack to easily view and access your shoes.
Consider installing a tilting shoe rack that allows you to view and access your shoes at a glance.
This type of shoe rack is particularly useful for organizing and selecting shoes quickly.
Keep Regular Wear Shoes in the Foyer or Entrance Area
Dedicate a specific area in your foyer or entrance for everyday shoes.
Use a shoe tray, basket, or bench to keep shoes organized and off the floor.
Choose a space that is easily accessible when entering or leaving the house.
Add a mirror to the area to check your appearance before stepping out.
- Choose the Right Space:
Select a space in your foyer or entrance that is spacious enough to accommodate your shoe storage solution and allow easy access.
Consider the layout and traffic flow of your home to ensure that the designated area doesn’t obstruct movement or create a hazard.
2. Install Shoe Storage Solutions:
Invest in a shoe rack or shelf that matches the style and decor of your home.
Utilize shoe trays or baskets to keep shoes organized and prevent dirt from spreading.
If you have limited floor space, consider installing a wall-mounted shoe organizer or utilizing the space under a bench.
3. Label the Shoe Storage:
Use labels to identify each family member’s shoe storage space, making it easier for everyone to find their shoes quickly.
Create a system for seasonal shoe storage, storing out-of-season shoes in a designated area or closet.
4. Add a Mirror and Hooks:
Place a mirror near the shoe storage area to check your appearance before leaving the house.
Install hooks or a coat rack nearby to hang coats, bags, and other accessories, creating a convenient and functional entryway.
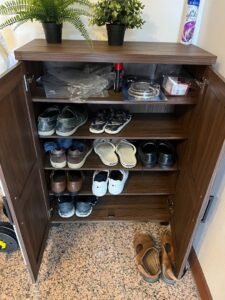
Use a Pull-Out Accessory in Your Wardrobe for Luxury Shoes
- Install a pull-out accessory in your wardrobe to store and protect your luxury shoes.
- Opt for a sliding drawer or a rotating carousel to maximize space and accessibility.
- Consider adding lighting to the accessory to easily view your shoes.
- Use soft, padded dividers to prevent scratches and damage to your shoes.

Benefits of Using a Pull-Out Accessory:
Space Optimization: A pull-out accessory makes the most of vertical space in your wardrobe, allowing you to store more shoes without cluttering your closet.
Easy Accessibility: Sliding drawers or rotating carousels offer quick and convenient access to your shoes, making it easy to choose the perfect pair for any occasion.
Protection and Organization: Soft, padded dividers help prevent scratches, scuffs, and creases on your shoes. Additionally, the accessory can be customized with adjustable shelves or compartments to accommodate different heel heights and styles.
Installation and Design Considerations:
Location: Choose a suitable location in your wardrobe where the pull-out accessory can be installed without obstructing other items or doors.
Size: Consider the number of shoes you plan to store and choose an accessory with the appropriate dimensions.
Material: Opt for durable and sturdy materials such as wood, metal, or acrylic to ensure the accessory’s longevity.
Lighting: Incorporating lighting into the accessory can be a thoughtful touch, providing better visibility and making it easier to find the shoes you’re looking for.
Design: Select a design that complements the overall aesthetics of your wardrobe and personal style.
By incorporating a pull-out accessory into your wardrobe, you can enjoy a luxurious and organized shoe storage solution that keeps your prized possessions safe and accessible.
Use Acrylic Boxes to Display Your Shoes
For sneaker enthusiasts or those who love to showcase their shoes, acrylic boxes are an excellent option.
Choose clear or colored boxes to match your décor and personal style.
Stack the boxes vertically or horizontally to create a feature wall or display.
Add LED lights inside the boxes for a dramatic effect and better visibility.
Use Acrylic Boxes to Display Your Shoes:
Why Acrylic Boxes?
Transparency: Acrylic boxes provide a clear and unobstructed view of your shoes, allowing you to appreciate their design and craftsmanship.
Durability: Made from sturdy acrylic material, these boxes are built to last and protect your shoes from dust, dirt, and moisture.
Versatility: Acrylic boxes are available in various sizes and styles, making them suitable for different types of shoes, from sneakers to heels and boots.
Customization: You can personalize your acrylic boxes by adding LED lights, colored panels, or decals to match your décor and personal style.
How to Use Acrylic Boxes:
Choose the Right Size: Select acrylic boxes that are the appropriate size for your shoes. Measure the length, width, and height of your shoes to ensure they fit comfortably inside the boxes.
Stack or Arrange: You can stack the acrylic boxes vertically or horizontally to create a visually appealing display. Alternatively, you can arrange them in a grid pattern or on shelves for a more organized look.
Add Lighting: To enhance the visual impact of your shoe display, consider adding LED lights inside the acrylic boxes. This will illuminate your shoes and make them stand out, especially in low-light conditions.
Personalize Your Display: To add a personal touch, you can customize your acrylic boxes with colored panels, decals, or stickers. This will help you create a unique and cohesive display that reflects your style and taste.
Arrange by Theme or Color: Group your shoes by theme, color, or style to create a cohesive and visually appealing display. For example, you could have a section for sneakers, another for heels, and a third for boots.
Don’t Overload: Avoid overloading the acrylic boxes with too many shoes. This can make the display look cluttered and detract from the shoes’ beauty. Aim for a balanced and minimalist look.
By following these tips, you can use acrylic boxes to create a stylish and functional shoe display that will showcase your collection and add a touch of sophistication to your home.
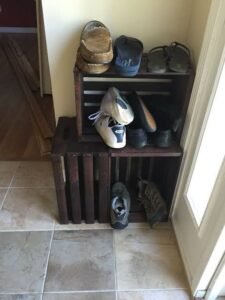
Get Creative with Your Shoe Storage
Utilize baskets or bins to store shoes on shelves or in cubbies.
Hang shoes on a wall-mounted shoe rack to save floor space.
Use a shoe organizer that fits under your bed for seasonal or less frequently worn shoes.
Repurpose a storage ottoman or bench with a lift-up top for shoe storage.
Install a shoe cabinet or armoire in your bedroom or dressing room.
Get Creative with Your Shoe Storage:
Utilize baskets or bins to store shoes on shelves or in cubbies:
Choose baskets or bins in various sizes to accommodate different types of shoes.
Label the baskets or bins with the type of shoes stored inside for easy organization.
Stack the baskets or bins neatly on shelves or in cubbies to maximize vertical space.
Hang shoes on a wall-mounted shoe rack to save floor space:
Install a wall-mounted shoe rack in your entryway, closet, or mudroom.
Choose a shoe rack with multiple tiers to accommodate different shoe heights.
Hang shoes by their heels or toes, depending on the style of the shoe.
Use a shoe organizer that fits under your bed for seasonal or less frequently worn shoes:
Purchase a shoe organizer that fits under your bed’s dimensions.
Choose a shoe organizer with multiple compartments or shelves to store different types of shoes.
Slide the shoe organizer under your bed to keep seasonal or less frequently worn shoes out of sight.
Repurpose a storage ottoman or bench with a lift-up top for shoe storage:
Choose a storage ottoman or bench with a sturdy lid that can support the weight of your shoes.
Place the storage ottoman or bench in your entryway, bedroom, or dressing room.
Store shoes inside the ottoman or bench, keeping them out of sight and organized.
Install a shoe cabinet or armoire in your bedroom or dressing room:
Choose a shoe cabinet or armoire that matches the style of your bedroom or dressing room.
Install the shoe cabinet or armoire in a convenient location, such as near your closet or dresser.
Store shoes inside the shoe cabinet or armoire, keeping them organized and protected from dust.
Conclusion:
Organizing your shoes effectively not only keeps your living space clutter-free but also extends the lifespan of your footwear. By implementing the tips in this guide, you can create a functional and aesthetically pleasing shoe storage system that meets your needs and preferences.